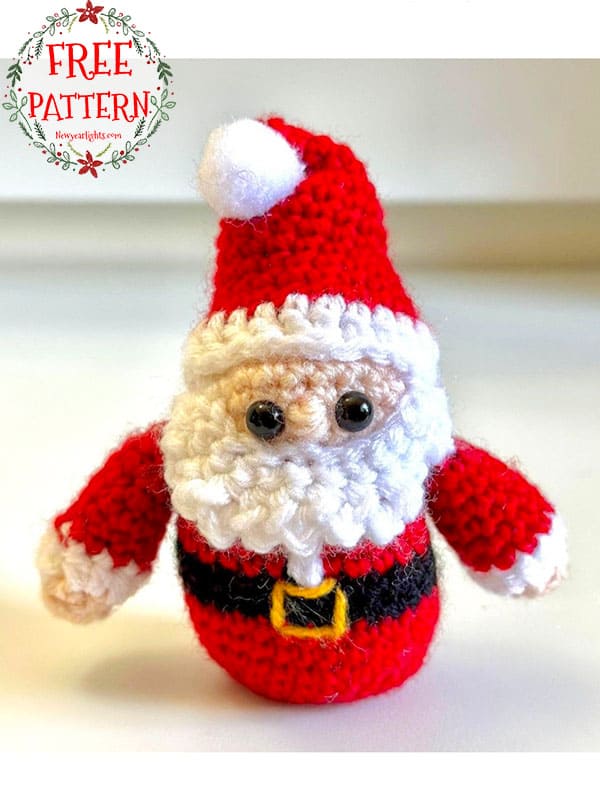
This crochet santa ornament looks great. Although the new year has just passed, it is a great crochet Santa ornament that you can use next year. It will be a perfect crochet christmas ornament with all its details. The head and body of this crochet Santa ornament are one piece. We make the arms and hat separately. Then we will make the beard and move on to the other details and embroidery. It is an intermediate level pattern. I hope you enjoy it. Now take a look at the free crochet Santa ornament pattern below.
Mini crochet santa ornament
Designer: poppiesandami
Materials:
Yarn and hook:
Patons classic wool in red.
Red heart super saver in white and black.
Hobbii amigo yarn in peach or any worsted/medium 4 yarn brand of your choice.
3.75mm crochet hook.
Stitch marker.
8mm safety eyes.
Polyfill stuffing.
Scissors.
Tapestry needle.
Small pompoms.
Yellow and black embroidery.
Glue gun and sticks if sewing is not preferred (optional).
Abbreviations:
ch- chain
st- stitch
slst- slip stitch
sc- single crochet
hdc- half double crochet
dc- double crochet
dec- decrease
inc- increase
FO- fasten off
Difficulty level: Advanced beginner.
Finished size: from the tip of the hat, 5″ tall x the widest part of the body 4″. If recommended yarn size and hooks are followed.
Gauge: 5 rounds and 5 sts=1″
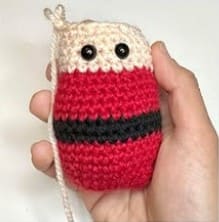
The body and head of the pattern are worked as one piece from bottom and up. You are going to work in chains and will turn into continuous rounds.
Body
In red yarn:
R1. Chain 7, sc around the chains starting in the 2nd ch from the hook. (12)
R2. inc in each st. around (24)
R3-4. sc around (24)
In this round, your work is supposed to be in an oblong shape.
R5 3sc, inc x (30)
R6-7. sc around (30)
Switch to black yarn for the belt
R8-9. sc around (30)
Switch to red.
R10-13. sc around (30)
R14. 3sc, dec x 6 (24)
Switch to peach yarn for the head or the face.
R15-18. 18 sc around.
Place the safety eyes in between R16 and R17. 1st apart.
Note: For the safety eyes, I prefer to attach them with the wider part of the backing facing out. Use a strong glue before inserting the yes. In that way, they will be more secure.
R19. 2 sc, dec x6 (18)
R20. 1 sc, dec x6 (12)
Stuff before R21.
R21. dec x6 (6)
FO and closing the top is not necessary.
Arms (Make 2)
In peach yarn:
R1. 6sc in a magic ring (6)
R2. sc around (6)
In white yarn.
R3. ch2 (this is counted as hdc), 1hdc in the same st with ch2. 2 hdc (inc) in each st around. (12)
In red yarn.
R4. sc around (12)
R5. 4sc, dec x 2 (10)
R6-7. sc around (10)
Stuff before R8.
R8. dec x 5 (5)
FO and leave a long tail for sewing.

Hat
This hat works from top to bottom.
In red yarn.
R1.4 sc in a magic ring
R2. 1sc, inc x 2 (6)
R3. 2sc, inc x 2 (8)
R4. 3sc, inc x 2 (10)
R5. 4sc, inc x 2 (12)
R6. 1sc, inc x6 (18)
R7-9. sc around (18)
R10. 8sc, inc x 2 (20)
R 11-12. sc around (20)
R13. 2sc, inc x 6 (24)
R14. 3sc, inc x 6 (30)
Switch to white yarn and work on the ribbing.
R15 ch 2, dc in each st around. (30)
FO and leave a long tail for sewing.

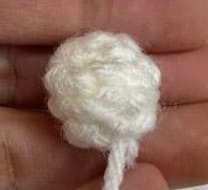
Small Pompom
Make this if small soft pompoms are not available.
R1. 4sc in a magic ring (4)
R2. 1sc, inc x2 (6)
R3. sc around (6)
R4. 1sc, dec x 2 (4)
FO and stuffing is not necessary.
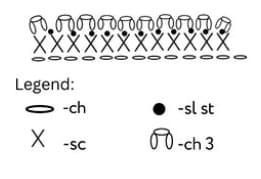
Beard
This part of the pattern works in rows.
In white yarn.
R1. ch 13, sc across starting from the 2nd ch from the hook.
Note: work with picot-like stitch across. The only difference from the actual picot stitch is that you don’t slip stich in the same stitch where ch 3 was made.
This will create a leaf-like shape for the beard.
R2. ch 3 and turn, slst in the next st. ch3, slst in the next st. Repeat the same principle until the last st.
You should end up making slst in the very last st. Total of 10 picots.
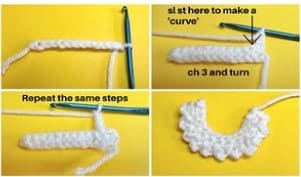
Note: the diagram shown is how you would work beard as you face it.
Assembly
For the assembly, you are going to work from the top to bottom.
1. Sew the hat or attach in on the head, 1 round above the eyes using a glue gun in preferred. Stuff some polyfill in the hat like halfway through before attaching it.
Cover the back of the head (the peach color) with the hat. It would be helpful to use ballpins while sewing for it to be secured.
2. Sew the beard around the eyes covering some of the skin part of the face.

3. Flatten the topmost part of the arms and sew them both sides of the body, just under the round in peach color.

Embroidery
Nose:
In between the eyes and using a tapestry needle and peach yarn, make a small horizontal line.
Size of 1st or round. Do this multiple times.

Blouse lining:
With white yarn, make a surface slst. in the middle and half of the santa. Start above the belt to the middle of the beard.
If you have never done this before, just embroider a vertical straight line from the points mentioned.

Belt lining:
Using yellow yarn or yellow cotton floss, make a square in the middle of the belt.
The size of the square is 2 sts per line.

admin
Recommended To You